How Can We Help?
GPS U-CENTER Configuration
Its recommended to use GPS module that Supports Flash Memory , NMEA & UBX Protocol
Ublox Setup for GPS in U-Center Require USB FTDI
https://www.u-blox.com/en/product/u-center

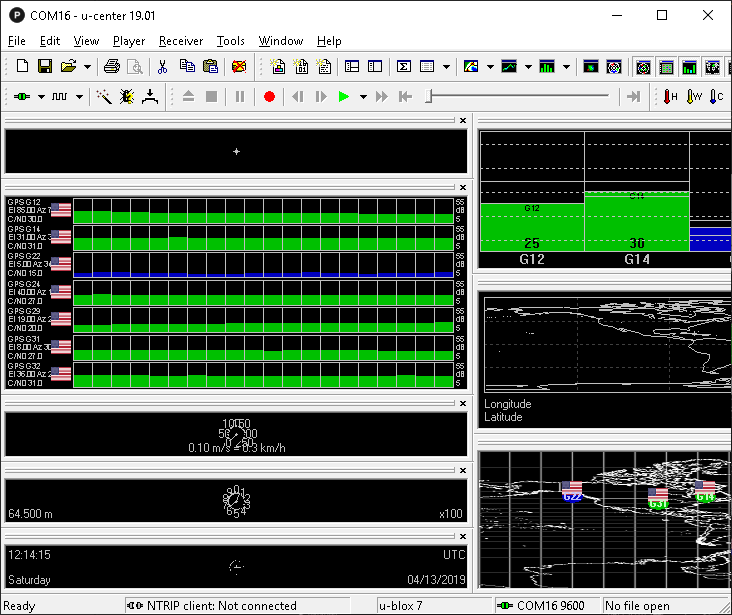
like with all drone Navigation depends one major component responsible for Loiter , RTH , Missions modes . its important that the GPS is setup correctly to ensure reliable navigation of your drones.
If the Orange LED is not flashing on Boot up . This means the Baud rates of the Arduino and the GPS module are not matching hence Synerduino cant Read the GPS Module

UBLOX GPS with Flash/EEPROM or with good onboard battery
For ublox GPS with build in flash memory depending on the model its possible to save the configuration long term using the Ucenter application
Basic settings:
GNSS:
depends on your module, If you have one that support multiple networks like GPS, Galileo, Glonass, BeiDou for the use in the our region we use GPS & Glonass.
Enable these GNSS constellations with support from your GPS module

NAV5:
on Dynamic Navigation Modes we Choose
- Pedestrian for more precise hovering Ideal for multirotors
- Portable for Fixwings or multirotor cruising flights
- Airborne <1g <2g <4g for Fixwings long range

.

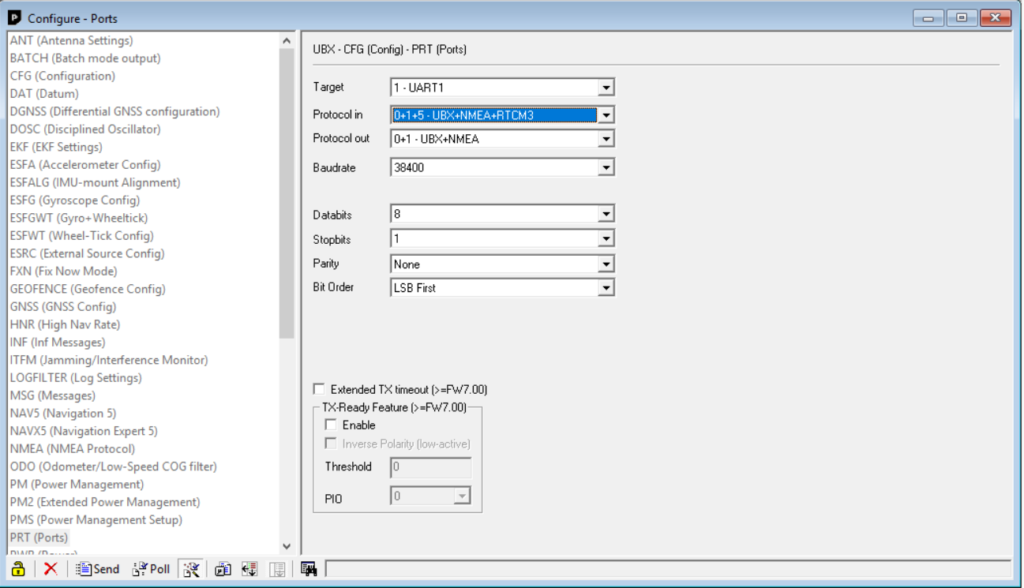
PRT:
Protocol in: UBX+NMEA+RTCM2
Protocol out: UBX +NMEA
Baudrate:57600 (faster rates) or 38400 (slower rates)
RATE:
By default it is at 1Hz refresh rate.
The higher this rate is the more data per second wil be send to our flight controller;
The maximum rate depents what type of module you use and what it’s capable of.
this provides the best speed for your GPS
200ms = 5Hz
CFG (Configuration) select Flash Press SEND button and lock
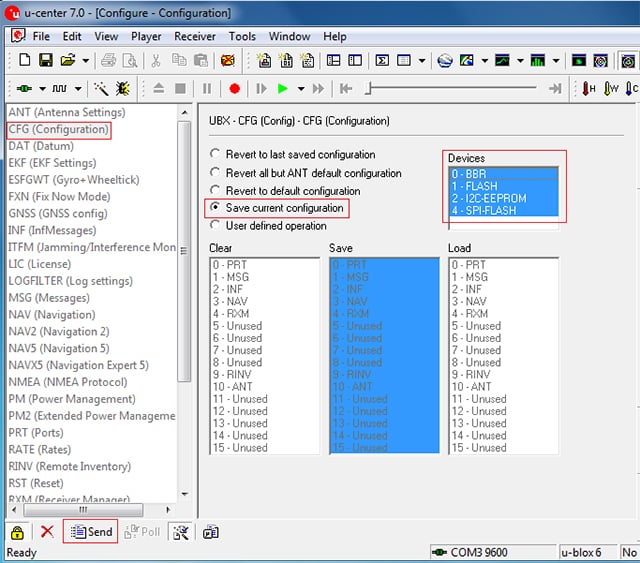
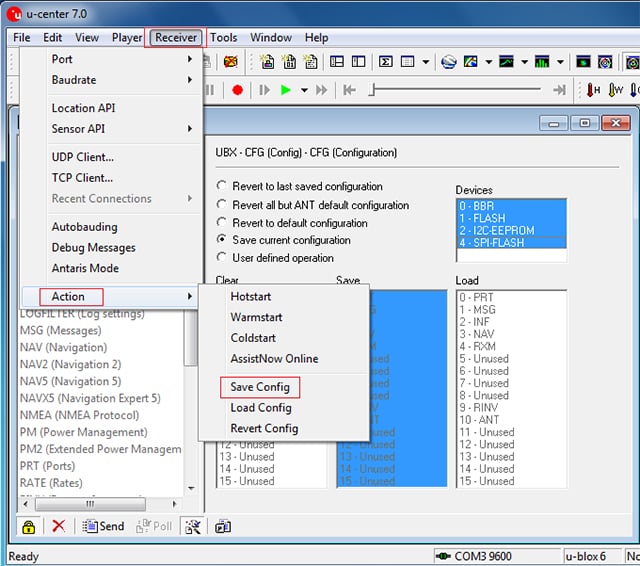
- BBR – Save to Battery Powered ROM (limited for how long you can retain config to battery life)
- FLASH – Save to Flash Chip (if GPS Contains Flash Chip)
- I2C EEPROM – Save to EEPROM Chip (if GPS Contains EEPROM Chip)
- ISP FLASH – Save ISP Flash module
Ublox GPS without Flash / EEPROM on Low Cost GPS
Only works for M7 and M8 GPS that supports old UBX format

Cases like this the GPS would always Reset to default when not used for a long time as it always depends on the BBR (Backup Battery to supply ROM memory ) and with the absent of a flash or EEPROM memory Chip saving the config data while the GPS is unplug is impossible .
(should you decided to use the default GPS settings for surface vehicles you need to configure it too on the Arduino sketch Config.h)
Basic settings:
GNSS:
depends on your module, If you have one that support multiple networks like GPS, Galileo, Glonass, BeiDou for the use in the European region we use GPS & Glonass.
NAV5:
on Dynamic Navigation Modes Portable
PRT:
Protocol in: UBX+NMEA
Protocol out: UBX
Baudrate: 9600
RATE:
By default it is at 1Hz refresh rate.
The higher this rate is the more data per second wil be send to our flight controller;
The maximum rate depends what type of module you use and what it’s capable of.
1000ms = 1Hz
CFG (Configuration) select Flash Press SEND button and lock

note: that the Baud should much your GPS settings done on the module
Add GPS Default to the line in GPS config.h
#define GPS_BAUD 9600 // GPS defaultGPS with Dead Battery
The problem
Many GPS modules have a small backup battery (BBR) that allows the GPS to save information, including settings, satellite info, time & more when power is disconnected. As these batteries age they become depleted, causing the GPS to lose the ability to save information that can greatly speed up the time to a first fix when restarting the device. Typically this battery is soldered in pace making replacement difficult. This article offers an easy solution. voltage for the battery backup is 2v (aprox) to 3.6 volts
NEO-6M is a ROM only receiver so you can only save configuration into BBR (backup battery RAM). if your backup battery is dying after couple of hours. For testing maybe you can just connect separate power supply to V_BCKP pin of NEO-6M to ensure it keeps configuration. If it works they you just need to get a better battery.
Some helpful GPS background info
Before explaining this problem and a solution, it is important to understand a little bit about how a GPS receiver acquires the GPS satellites and the different modes of satellite acquisition.
The first fix
The GPS system is a constellation of 24 operating satellites orbiting Earth. These satellites are not in geosynchronous orbits so they are constantly moving across the sky as they orbit Earth. At any given time half of the satellites are on the wrong side of the planet and more may be otherwise hidden from view by terrain, foliage, buildings etc. To get a position fix, at least four satellites need to be visible to the GPS receiver while it gets its first fix.
A GPS receiver that is powered up for the first time or has not been powered up in a few hours or lost its saved information, due to battery backup failure, goes through a process called a “Cold Start”.
When a GPS receiver cold starts, it has no information about which satellites are visible in the sky, where it is located and what time it is, so it has to spend time searching and acquiring the satellites by searching the available GPS frequencies for satellites. Once a satellite is found, the GPS needs to listen to the satellite data for ephemeris data that is used to establish the receiver’s position. To establish a position fix, the receiver needs to acquire at least four satellites and spend time listening to them before calculating its first position (Aka the first fix).
A cold start of the UBlox 7M receiver with a good view of the sky, takes at least 30 seconds to acquire the satellites and provide a first fix. Often the acquisition can take longer, up to several minutes when signals are not strong. This time is known as “Time to first fix” (TTFF).
As time progresses after the first fix, more and more satellites may be acquired and a more accurate position fix can be obtained. The more satellites that are acquired, the better the accuracy of position can be calculated.
The GPS receiver will save the ephemeris data into it’s memory. It will also maintain its time using an on board Real Time Clock (RTC). Keeping the clock and data alive requires a very small amount of power from the backup battery. If the receiver is then powered down and later restarted within a few hours, it can perform a “Hot Start” using the saved information and TTFF can take as little as a 1 second. A hot started GPS receiver can almost pick up where it left off at power down and quickly reacquire satellites that took minutes to initially acquire during a cold start. The hot start is a very significant time saver for the GPS.
The problem caused by a backup battery failure.
As you can now see the backup battery, when in good condition, can greatly improve the TTFF and accuracy of early positions fixes after power up. If your device keeps the GPS powered up all the time and can afford a long time to acquire an accurate position after power up, battery failure may not be a concern.
However devices, with limited power that only need occasional position fixes can save a lot of power consumption by turning the GPS off and then hot starting when needed. One such example device. When the backup battery fails, each start will be a cold start, consuming much more power while the fix fix is obtained..
The solution to a dead backup battery.
Because a battery powered device already has a voltage source (i.e. the main battery) it can easily be used in place of the dead backup battery.
For this solution to work your device needs to be able to switch the Vcc (Voltage) input to the GPS receiver on/off while leaving the ground connection connected. FS2 and FS3 balloons, could not do this without a change in the circuit design for the GPS power switch because they turned the GPS on/off by switching the the ground connection instead of the Vcc.
The solution is to run a second Vcc line to the + connection of the battery backup. This Vcc line will only draw very small amounts of power while the GPS is off. When the GPS is needed, the main Vcc to the GPS can be switched on and it will start with a hot start.
On the Ubox 7M GPS the required voltage for the battery backup is 2v (aprox) to 3.6 volts. This is within the operating range of the battery used , so it is a very easy to connect the main Vcc (Battery +) to the battery pads on the GPS printed circuit board by soldering a a single wire.
To switch the GPS Vcc on/off a PNP transistor and a resistor can be used as a switch. The control line to the circuit needs to be logic High to turn the GPS off and Logic Low (0V) to power the GPS on.
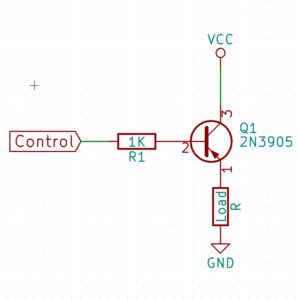
In my tests this allowed my GPS indoor, with poor signal conditions, to hot start every time the GPS was power after the initial cold start. It is important to know that on the the cold start you should let the GPS run for a minute or more to collect the needed data and acquire more satellites for a subsequent hot start.

The problem is that these modules “forget” to use the externally stored configuration after the backup power supply has been removed or dropped too low. by solder on a diode and double AA battery 2cells 3V holder onto the module in order to retain the configuration. this setup can also use a CMOS button cell used in computer motherboard to retain clock and Rom data
Note on GPS types they Come in NMEA Protocol or UBLOX protocol


SYNERDUINO ARDUINO
Config.h

Change to Define GPS_BAUD 57600 this gives it more speed

there are 2 protocol you can choose depending on your GPS module configuration
NMEA w/ Flash
M6 – M8 (NMEA) , M9 (NMEA), M10 (NMEA)
UBLOX w/ Flash or W/o Flash
M7 (NMEA & UBX ), M8 (NMEA & UBX )

GPS.CPP
24-8-2025 Update
For Synerduino Arduino Boards its recommend you select NMEA for those supplied with M9 and M10 GPS/GNSS modules
you can tell on the Lower Tab when connecting your GPS module to the U-Center what version your GPS module is at the indicator tab on the bottom of the window
24-5-2024 update
with Recent M9 and M10 GPS we recommend the NMEA string be added changing the P for N this would be compatible for M8-M10 GPS modules however you Require a GPS module with FLASH and be configured using UCenter
//M5-M6 Protocol uncomment to activate
//if (string[0] == ‘G’ && string[1] == ‘P’ && string[2] == ‘G’ && string[3] == ‘G’ && string[4] == ‘A’) frame = FRAME_GGA;
//if (string[0] == ‘G’ && string[1] == ‘P’ && string[2] == ‘R’ && string[3] == ‘M’ && string[4] == ‘C’) frame = FRAME_RMC;
//M8-M10 Protocol uncomment to activate
//if (string[0] == ‘G’ && string[1] == ‘N’ && string[2] == ‘G’ && string[3] == ‘G’ && string[4] == ‘A’) frame = FRAME_GGA;
//if (string[0] == ‘G’ && string[1] == ‘N’ && string[2] == ‘R’ && string[3] == ‘M’ && string[4] == ‘C’) frame = FRAME_RMC;
SYNERDUINO STM
INAV Ports
Synerduino STM and INAV setup place the Ports on SoftSerial 1 Sensors GPS Baud 57600

INAV GPS
Here you can Check GPS status
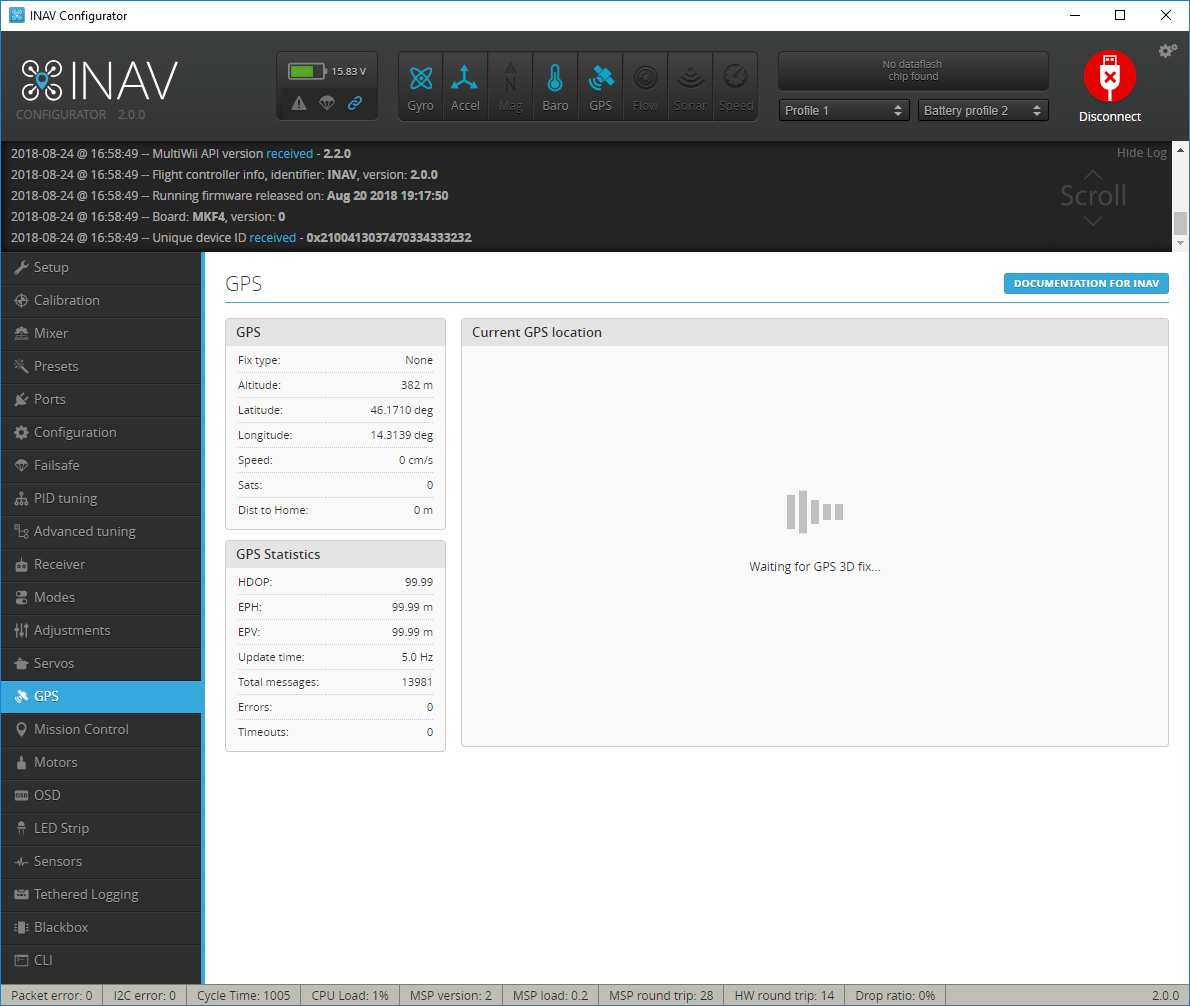
INAV CLI
command : set gps
here you can set the GPS configuration as necessary to match that setting on the UCenter Configuration

INAV CLI : Set Dyn Model
- set gps_dyn_model = Pedestrian for more precise hovering Ideal for multirotors
- set gps_dyn_model =Portable for Fixwings or multirotor cruising flights
- set gps_dyn_model = Air_1g or Air_4g for Fixwings long range
INAV CLI : SBAS
When using a UBLOX GPS the SBAS mode can be configured using set gps_sbas_mode = AUTO
The default is AUTO.
| Value | Region |
|---|---|
| AUTO | Global |
| EGNOS | Europe |
| WAAS | North America |
| MSAS | Asia |
| GAGAN | India |
| NONE | NONE |
GPS Configuration U center
preset for the following GPS module – U Center


