
How Can We Help?
Missions , Auto mode Tips and Tricks
Putting your Vehicle into Mission or Auto modes with Synerduino default function , Please ensure the following is calibrated and tune correctly See: Calibration Page
- Compass
- Accelerometer
- Barometer
- PID Parameter
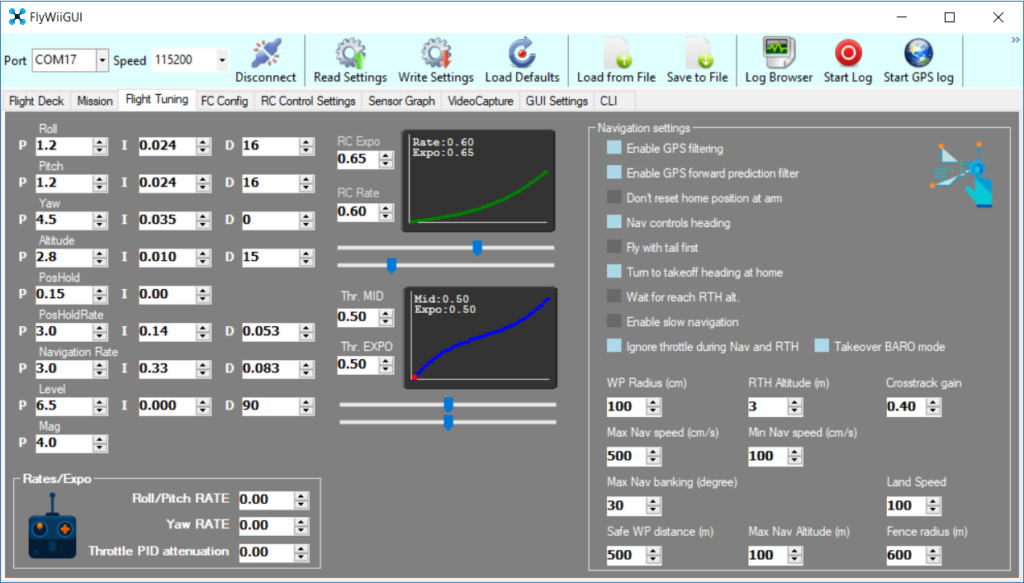
- Enable GPS Filtering – base on travel of drone GPS would filter out small deviation of rouge positioning signals
- Enable GPS Forward Prediction Filter – base on heading of travel GPS would predict its course to better adjust its position
- Dont Reset home position on Arm – Home position base on where you Arm your drone or where you plug in your drone
- Nav control Heading – front end forward
- Fly tail first – rear and forward
- Turn to take off Heading at Home – vehicle orientates heading to take off heading
- Wait to reach RTH Alt – vehicle would hold position and climb till RTH Altitude(m) is reach before initiating RTH
- Enable Slow Navigation – use slow rate
- Ignore throttle during Nav and RTH – throttle control is taken over for altitude control – make sure its centers stick till landed
- Take over BARO Mode – altitude control taken over my mission mode
To Start with your GUI by having HORIZON mode active this can be done on any unused Aux switch in M selection (write setting when done) for beginners and Mission mode this is required to have the drone self stabilize
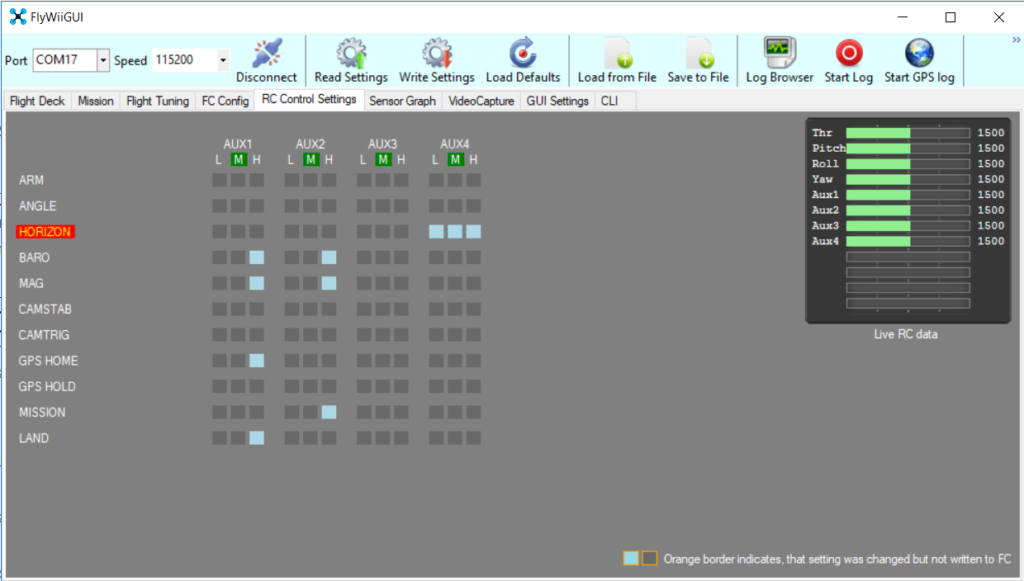
Aux 1 and Aux 2 switch on your remote to select with H selection of your Aux Channel ,
- ARM – this uses the Aux switch to Arm the vehicle. Alternative to combination sticks (Mainly use for Fixwings and Surface vehicles)
- ANGLE – Sport mode for advance flyers mostly manual flying
- HORIZON – keeps vehicle Level at all times (For Aircraft Beginner or Mission mode)
- BARO – Holds Altitude (must be Active on Mission Mode)
- MAG – Holds Heading (must be Active on Mission Mode)
- HEADSFREE – Course Lock base on last heading the mode is active (UNO and MW2.2 boards and sketch)
- GPSHOME – Return to Home where the Vehicle is Arm (Requires GPS)
- GPSHOLD – Hold Position of Vehicle (Requires GPS)
- MISSION – Vehicle Runs Waypoint Missions as uploaded on Mission Tab
- LAND – initiate auto landing after the drone Returns Home (this is use in combination to GPSHOME mode)
- PASSTHRU – complete Manual mode (Applicable for Fixwings)
- CAMSTAB – Camera Gimbal stabilize function (is set on the Arduino)
- CAMTRIG – Camera or Payload Switch (is set on the Arduino)
Combination function of Aux channel , Aircraft must be flying before activating these combinations
- Position Hold – HORIZON, BARO, MAG, GPSHOLD
- Return to Home – HORIZON, GPSHOME, BARO, MAG, LAND
- Mission – HORIZON, MISSION, BARO, MAG
- Course Lock – HORIZON, BARO, MAG, HEADSFREE (only applicable in MW2.2)

Remember that Default Altitude is (Above Ground Level is 25 meters (Adjust it on default field )
Mission Tab & Right Click on the map to open menu
- WAYPOINT – Puts Vehicle on Waypoint route
- POSHOLD_TIME – Vehicle waits at a certain time on the Waypoint Parameters (Second,Minute,Hour)
- POSHOLD_UNLIMITED – Vehicle Waits until Mission is switch off
- RTH – Vehicle Returns to Home Parameters (Land ( 0=off, 1=on)) determine if vehicle should land at Home position
- LAND – Vehicle Lands here at the set location (only used at the end of the waypoint mission)
- JUMP – jump to selected waypoint Parameters (waypoint number, Repeat no# of times)
- SETPOI – Point of interest , Vehicle heading would face this
- SETHEAD – set Heading of vehicle on this waypoint
For Multirotor and Fixwings
- 1 Arm the Aircraft
- 2 take off in horizon mode (fly this with stick until the aircraft gets above 2 meters off the ground )
- 3 Switch Aux onto any Auto Mode
- 4 to regain control switch off any Auto Mode with Throttle stick still at center
For Ground/Surface Vehicles
- 1 Arm Vehicle by Aux switch Preferably
- 2 Switch Aux onto any Auto Mode
- 3 to regain control switch off any Auto Mode